Amir Bazazi
See other author's postsOnce in a while, whether it be by someone I'm pairing with or someone who's just peeked over my shoulder, I'll get asked how I "got my terminal to look like that". From now on I'm just going to direct them to this post as I'm going to take a short while to explain how I achieved the colourful canvas I log into every day.
Just note that the following does not represent the full capabilities of the tools shown, this is just a little introduction to them describing what I achieved personally. For more information visit the official repository linked at the bottom of the page.
What are Shells, Zsh and Prezto?
Shells
For the uninitiated, I think it's worth providing a quick explanation of what you'll be tinkering with. If you already have some understanding of unix shells, you can just skip over some of these sections.
So what is a shell? In short, a shell is an interface that allows a user to communicate with your operating system. They can come in two forms, those being GUIs (Graphical User Interfaces) and CLIs (Command Line Interfaces). Microsoft Windows is a good example of a common GUI, Windows provides a desktop, task bar, start menu as well as a file browser, all of which aid the user in communicating with their operating system. CLIs are not so complex and are limited to a simple command line that takes keyboard inputs from the user to perform various tasks, although this may seem like a more primitive way of doing things, you'd be surprised how much more efficiently you can get things done once you're experienced with the command line.
Bash and Zsh
Bash and Zsh (Z-shell) are different types of CLI shells. Unix-based systems (that includes Mac OS X) use Bash by default. Many of you will have learnt how to navigate your terminal using bash. To tailor our terminal to be more awesome, we're going to be changing our default shell to Zsh.
My terminal is fine, why should I use Zsh?
Zsh offers a plethora of additional features on top of bash that you may find a little more convenient and easy to navigate, and as a result might save you some time or increase your efficiency a tad. If you're someone who prefers using the default bash shell, that's perfectly fine, you're entitled to your opinion, even if it is wrong.
Some features of note that I found particularly useful when I first made the switch are:

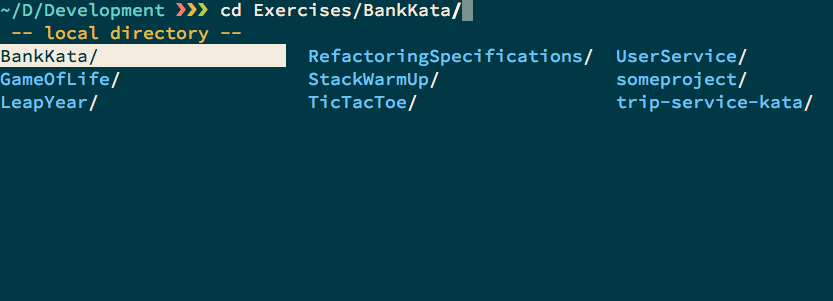
- 'cd' auto-completion
- 'cd' navigation
- Syntax highlighting (including file-type distinction)
- Command history sub-string search
- Right-hand prompt information
- Path expansion/replacement
- Spelling auto-correction
- Recursive deletion confirmation
Again, these features aren't necessary by any means, but they certainly help me navigate my terminal more effeciently and maybe they'll do the same for you. If you're still not convinced, some of these features are explained in a bit more detail in the presentation, "Why Zsh is Cooler than your shell" by Brendan Rapps.
So what's Prezto?
Prezto is a configuration framework for Zsh. It comes supplied with a variety of plugins and themes that can extend and customise your shell. There are other popular frameworks out there, one of which being Oh My Zsh which I have found to have more plugins and themes available, but is known to be considerably slower.
Ok I get it, How do I install the thing?
Open up a Terminal and launch zsh.
$ zsh
Then clone the git repository.
$ git clone --recursive https://github.com/sorin-ionescu/prezto.git "${ZDOTDIR:-$HOME}/.zprezto"
Create a Zsh configuration by copying the configuration files provided by the repo.
$ setopt EXTENDED_GLOB
  for rcfile in "${ZDOTDIR:-$HOME}"/.zprezto/runcoms/^README.md(.N); do
    ln -s "$rcfile" "${ZDOTDIR:-$HOME}/.${rcfile:t}"
  done
Lastly, set Zsh as your default shell.
$ chsh -s /bin/zsh
To apply all the changes, simply restart your terminal.
The official repository provides more instructions and troubleshooting here.
Fiddling with dotfiles.
As you are now changing shells, it's important to make sure you're loading the correct information regarding alias' and PATH variables on each shell start-up.
How you organise your own .profile, .bash_profile, .profile and .bashrc files is your own business. But just note that as you are moving away from bash and now using zsh, you must now export your path variables and source the correct files in .zshrc. If you are inexperienced, a simple way would be to move over any information you have inside the .bashrc file directly to the .zshrc file.
How do I get those colours?
The colour theme I use for my terminal is called Solarized. Conveniently, the terminal-specific themes can be found here at this repository
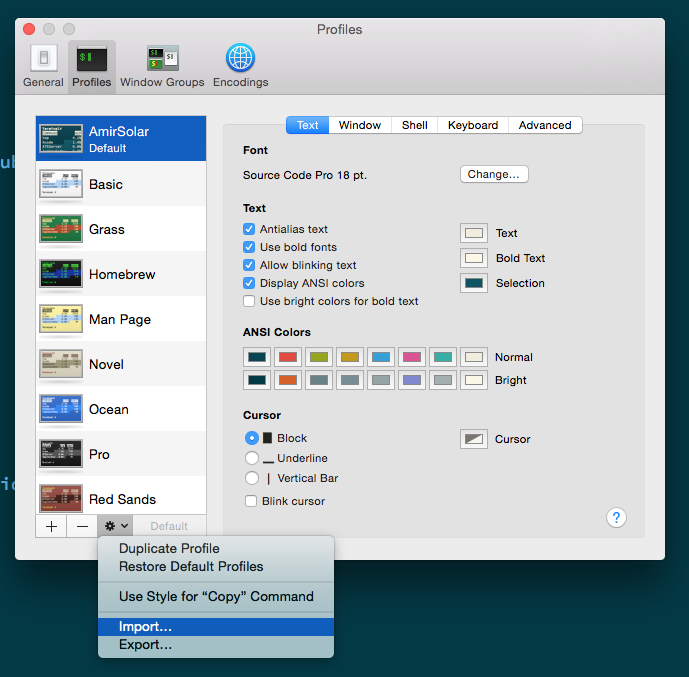
The colours I've used are from the file titled Solarized Dark.terminal from the repository. To install this file open up your Terminal, in the menu bar navigate to Terminal > Preferences and then use the import feature to load the profile. With the desired profile highlighted, you can then click the Default button to set it as such.

From here on every new terminal window you open will have the new profile colours loaded. I encourage you to play around with these colours and themes to whatever suits you.
Enabling plugins/modules
To view the list of available plugins available for use with Prezto, browse to the modules/ directory within .zprezto/. The available plugins are listed as sub-directories.
$ ls ~/.zprezto/modules
To enable a plugin, open up the .zpreztorc file in a text-editor.
$ vim ~/.zpreztorc
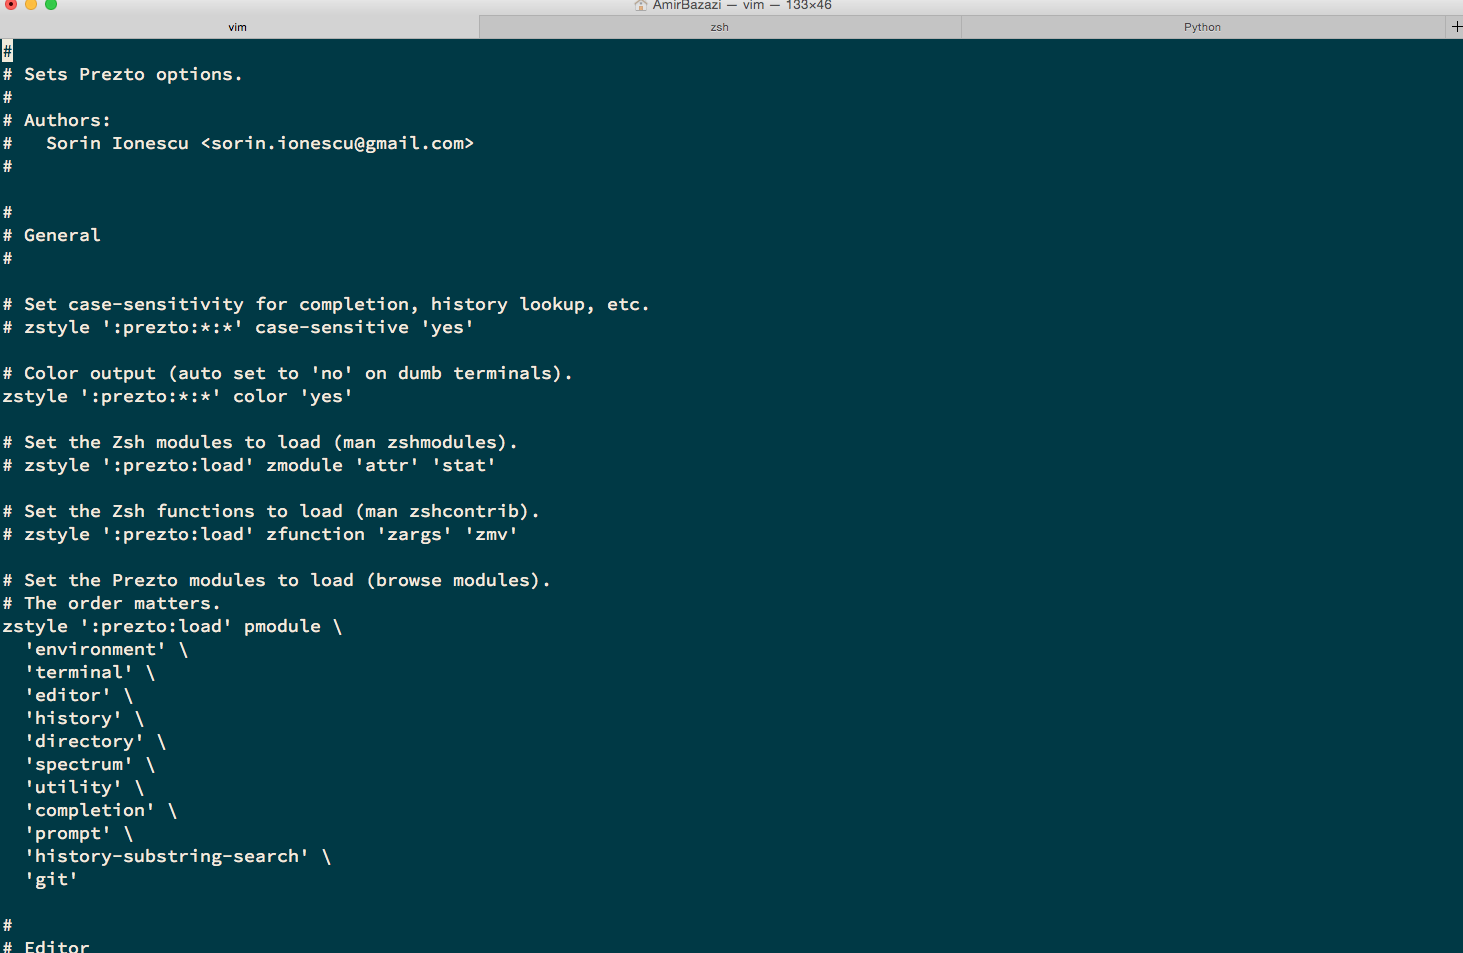
Under the line which reads zstyle ':prezto:load' pmodule \ there should be a list of already-loaded modules. Simple add any additional ones to the list. Personally, I added the history-substring-search and the git modules. My resulting file looks a little like this.

What's next?
This is as far as I've gotten with installing Zsh with zprezto and am happy with the features enough that I don't need to customise it further. However there is still a lot more you can do with the tools and plugins. For more tips, tricks and troubleshooting with prezto, visit the official repository found at https://github.com/sorin-ionescu/prezto
Feel free to send me an email if you have any questions, comments or problems at amir@codurance.com.
Related Blogs


- By André Guelfi Torres
- ·
- Posted 16 Apr 2019
Containers with Docker

- By Andrzej Rehmann
- ·
- Posted 25 May 2019
Private Jenkins Shared Libraries
Get content like this straight to your inbox!
Software is our passion.
We are software craftspeople. We build well-crafted software for our clients, we help developers to get better at their craft through training, coaching and mentoring, and we help companies get better at delivering software.
Latest Blogs
Software Modernisation and Employee Retention...
Becoming PCI Compliant
Codurance signs the Microsoft Partner...
Useful Links
Contact Us
London, EC1M 5PU
Phone: +44 207 4902967
2 Mount Street
Manchester, M2 5WQ
Phone: +44 161 302 6795
Carrer de Pallars 99, 4th floor, room 41
Barcelona, 08018
Phone: +34 937 82 28 82
Email: hello@codurance.com