David Hatanian
See other author's postsIntegration tests can be slow and unreliable because they depend on too many components in the system. Up to a certain point, this is unavoidable: integration tests are here to validate how each part of your system plays with other internal or external components.
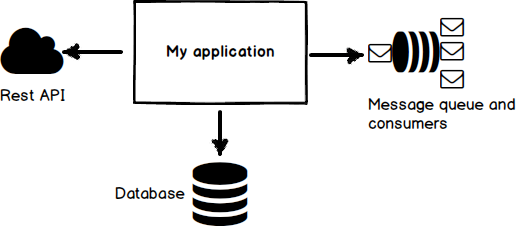
We can, however, improve some integration tests by only spinning up the required dependencies, instead of the whole system. Let's imagine an application that depends on a database, a third-party REST API and a message queue:

Assume now that we would like our integration test to validate a behavior that only includes calls to the REST API but no call to the database or the message queue. To give a concrete example, let's assume we want to check that our REST client is correctly configured to time out after 3 seconds.
All we need for this is a small Controller that will mock the REST API by waiting before returning an answer to the REST client. The wait time will be passed as a parameter in the query string.
@Profile("restTemplateTimeout") @RestController @RequestMapping(value = "/test") public class DelayedWebServerController {
@RequestMapping(value = "/delayRestTemplate", method = GET) public String answerWithDelay(@RequestParam Long waitTimeMs) {
<span class="k">if</span> <span class="o">(</span><span class="n">waitTimeMs</span> <span class="o">></span> <span class="mi">0</span><span class="o">)</span> <span class="o">{</span>
<span class="k">try</span> <span class="o">{</span>
<span class="nc">Thread</span><span class="o">.</span><span class="na">sleep</span><span class="o">(</span><span class="n">waitTimeMs</span><span class="o">);</span>
<span class="o">}</span> <span class="k">catch</span> <span class="o">(</span><span class="nc">InterruptedException</span> <span class="n">e</span><span class="o">)</span> <span class="o">{</span>
<span class="k">throw</span> <span class="k">new</span> <span class="nf">RuntimeException</span><span class="o">(</span><span class="n">e</span><span class="o">);</span>
<span class="o">}</span>
<span class="o">}</span>
<span class="k">return</span> <span class="s">"Delayed Result"</span><span class="o">;</span>
What is the @Profile annotation used for? If we inject this controller into our standard application context, this has several drawbacks:
- The test will be slow: we only need to start one controller, not the whole thing
- Our controller will be picked up by Spring and injected into every other integration test, slowing down each integration test and maybe stepping on another test's toes
A better alternative would be to spin up a minimal Spring Boot application exposing only our DelayedWebServerController. We will also tell Spring Boot to scan only the packages we are interested in, and to exclude persistence-related auto-configuration since we do not need it to spin up a controller. This is done in a Configuration class like this one:
@Profile("restTemplateTimeout")
@Configuration
@EnableAutoConfiguration(
    exclude = {DataSourceAutoConfiguration.class, HibernateJpaAutoConfiguration.class})
@ComponentScan(basePackages = "my.application.resttemplate.timeout")
public class DelayedWebServerConfiguration {
    //The class is empty and only used to support the annotations
}
The Spring context configuration can get quite confusing, let us look at the annotations one after the other:
@Profile: This tells Spring that this configuration should only be used when therestTemplateTimeoutprofile is active. Further in this article, we will see how we enable this profile for a specific integration test. It is this annotation that prevents the configuration to be picked up by other unrelated integration tests. Note that ourDelayedWebServerControlleris identically annotated.@Configuration: Standard annotation to tell Spring that this is a context configuration class.@EnableAutoConfiguration: Here we disable some of the Spring Boot "magic" that we do not need for our specific test@ComponentScan: We speed up the Spring Boot application startup by only scanning one package instead of the whole project. Any Spring-annotated class that is outside of this package will not be picked up by Spring.
Here is how the integration test looks like:
@RunWith(SpringJUnit4ClassRunner.class) @WebIntegrationTest("server.port:0") @SpringApplicationConfiguration(classes = DelayedWebServerConfiguration.class) @ActiveProfiles("restTemplateTimeout") public class RestTemplateShould {
@Rule public ExpectedException thrown = none();
@Value("${local.server.port}") private int port;
@Autowired private RestTemplate restTemplate;
@Test public void throw_timeout_if_response_lasts_more_than_two_seconds() { thrown.expect(ResourceAccessException.class); thrown.expectCause(instanceOf(SocketTimeoutException.class));
<span class="n">callEndpointWithDelay</span><span class="o">(</span><span class="mi">3000</span><span class="o">);</span>
Of course, all those classes are stored in our test source folder (usually src/test/java) since they are not required for production.
Let us have a look again at the annotations:
@RunWith: The test will use the Spring Junit runner who will take care of creating the Spring context for us.@WebIntegrationTest: Tells Spring that this is an integration test running a web application, otherwise by default Spring will not run an HTTP server in test mode. We also set theserver.portto a value of0so that Spring Boot choose a random port for the HTTP server to listen to. This allows to have several tests running in parallel, or to have another version of the application running in the background.@SpringApplicationConfiguration: We tell Spring where it will find theDelayedWebServerConfigurationclass we created before.@ActiveProfiles: Enables therestTemplateTimeoutprofile, otherwise theControllerand theConfigurationwill be filtered out.
We now have an integration test running with a limited set of dependencies instead of the whole application. What if we wanted to go further and add mocks into the game? This may be required when a dependency does not have a dev environment or that it is too complicated to call from a developer's workstation. In that case, we can add those mocks to the Configuration class and they will be injected into the test's Spring context.
Here is a Configuration example where we inject a custom CustomerService mocked by Mockito instead of the default one:
@Profile("validationTests")
@Configuration
@EnableAutoConfiguration(
    exclude = {DataSourceAutoConfiguration.class, HibernateJpaAutoConfiguration.class})
@ComponentScan(basePackages = {"my.application.controller",
    "my.application.actions"})
public class ValidationEndToEndConfiguration {
    @Bean
  public CustomerService customerService() {
    return Mockito.mock(CustomerService.class);
  }
}
With this approach, we can make our integration tests more resilient. For slow or unreliable dependencies, it is more efficient to have the developers run their integration tests against a mocked version. However, do not forget that in the end your application will have to integrate with the real system, not the mocked one. For this reason, it makes sense to have the continuous integration server run the tests against the real system at the very least every day.
Related Blogs


- By André Guelfi Torres
- ·
- Posted 08 Apr 2019
Introduction to Test Doubles

- By André Guelfi Torres
- ·
- Posted 16 Apr 2019
Containers with Docker
Get content like this straight to your inbox!
Software is our passion.
We are software craftspeople. We build well-crafted software for our clients, we help developers to get better at their craft through training, coaching and mentoring, and we help companies get better at delivering software.
Latest Blogs
Software Modernisation and Employee Retention...
Becoming PCI Compliant
Codurance signs the Microsoft Partner...
Useful Links
Contact Us
London, EC1M 5PU
Phone: +44 207 4902967
2 Mount Street
Manchester, M2 5WQ
Phone: +44 161 302 6795
Carrer de Pallars 99, 4th floor, room 41
Barcelona, 08018
Phone: +34 937 82 28 82
Email: hello@codurance.com