- Por Sandro Mancuso
- ·
- Publicado 23 Oct 2017
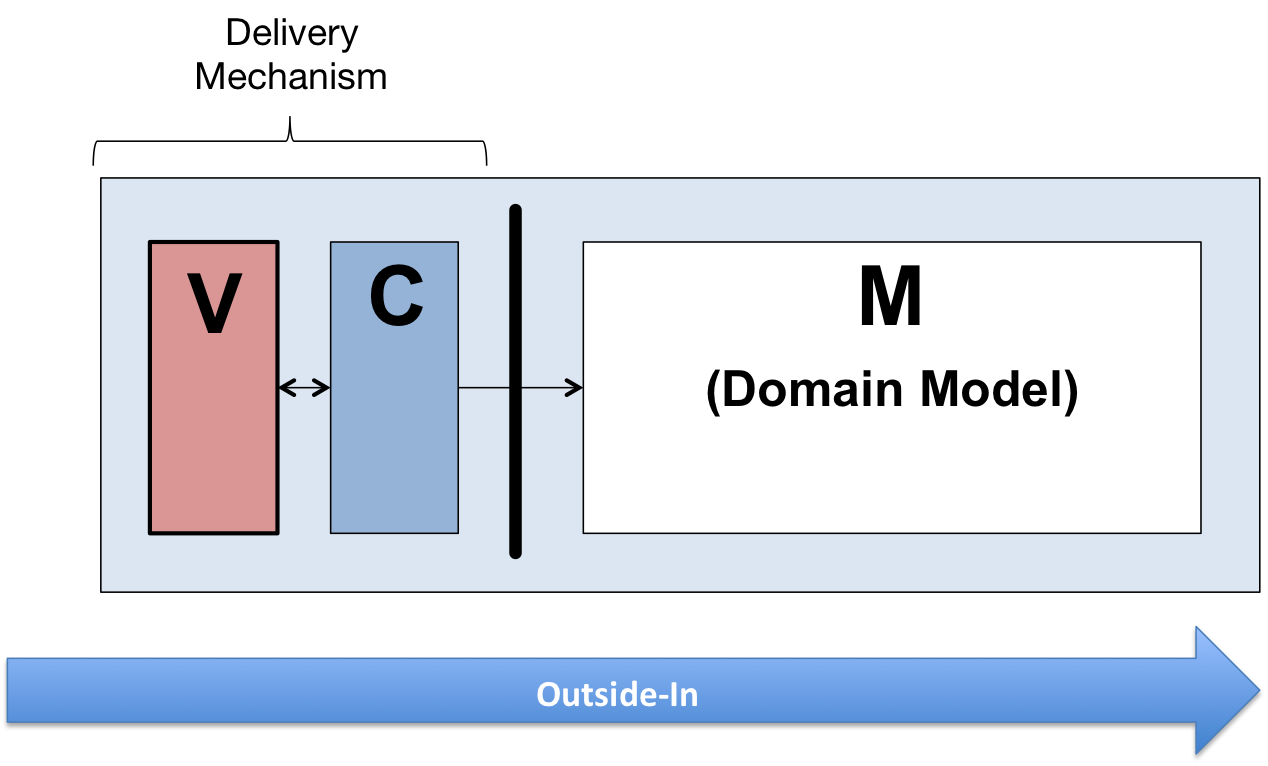
Outside-in Test-Driven Development (TDD) can be a challenge to implement. In this 3-part post series, Christian and I would like to share our experiences applying it to Android development and offer some practical tips for doing so yourself. In this first post of the series we will introduce the necessary concepts and present our broad approach to the problem.
Bearing in mind that we already have an architecture in our system, in most of the cases, we know the pieces that compose a feature's design upfront. That is why outside-in TDD suits our workflow better. If you already know the design, outside-in let you go faster than the baby steps followed in the classicist approach.
We have chosen the "Bank Kata" that Sandro uses on his screencast. You don't have to have watched this screencast to follow along, but it is useful as a primer on the concepts. In Sandro's screencast the problem is not build for Android, but we found it useful to have it as a base to show our approach to achieving the same effect on the Android platform, where the tools are different and it can be a bit tricky.
The problem description is as follows:
Create a simple bank application with the following features:
The original kata provides a class with the following structure:
public class Account {
    public void deposit(int amount) {
    }

    public void withdraw(int amount) {
    }

    public void showStatement() {
    }
}
And one constraint: You are not allowed to add any other public method to this class.
It's worth mentioning that we broke this constraint somewhat to add another public method to the Account class. We did this to in order to attach the view to the account object. We needed to do so because we have chosen to use Android activities, and as we all know and suffer, they are instantiated by the system. Therefore, we can not pass the view through the BankAccount class constructor.
We could have avoided adding this method by creating some kind of presenter, using the Account object there instead of calling it from the Activity. We consider it would make the code more complex and as it’s just a kata we’ve decided not to do so.
Let's start by describing the best-case workflow for tackling this problem. The starting point should ideally be a user story defining what needs to be done, who are we building it for, and why we are building it. For further information about how to write users stories, visit this link
The starting point should be a user story defining: What needs to be done, who are we building it for and why we are building it.
The user story for the show account statement feature could be written as follows:
Story: Show account statement
As a user
I want to be able to see my bank statement So that I can check all the transactions I have made
With the user story completed, we can now define the acceptance criteria - the series of results that required in order for the feature to be considered done.
That been said, once we got the user story, the next step would be to extract the conditions that the software must satisfy to be accepted, known as the acceptance criteria. Those acceptance criteria will define a series of results that must be validated to consider that the feature is done.
The acceptance criteria that we have came up with for the “Show account statement” story are:
Scenario 1: Account with transactions
Given the account has the following transactions:
When the user requests the bank statement
Then the statement should contain a list of all the transactions in reverse chronological order And each statement line should contain the transaction amount, date and running balance
Before getting our hands dirty with the code, we have to configure the tools that we are going to use to write our tests. We have chosen JUnit, Mockito and Espresso for assertions in Android views. We have to add their dependencies to the project build.gradle as follows:
testCompile 'junit:junit:4.12'
testCompile 'org.mockito:mockito-core:1.10.17'

androidTestCompile "com.android.support.test:runner:0.4.1"
androidTestCompile "com.android.support.test:rules:0.4.1"
androidTestCompile "com.android.support.test.espresso:espresso-core:2.2.2"
androidTestCompile("com.android.support.test.espresso:espresso-contrib:2.2.2") {
    exclude module: 'recyclerview-v7'
    exclude module: 'support-v4'
}
androidTestCompile 'org.mockito:mockito-core:1.10.17'
androidTestCompile 'com.google.dexmaker:dexmaker:1.2'
androidTestCompile 'com.google.dexmaker:dexmaker-mockito:1.2'
And at the bottom of the file:
resolutionStrategy.force "com.android.support:support-annotations:$supportLibraryVersion"
For the sake of clarity of this exercise, we are going to use the default source set src/androidTest for our acceptance tests and src/test for the unit tests. This configuration may not be the ideal in a actual Android project, due to the fact that you would need to add some unit tests for the Android components in your project. In that case, you could end up with a mix of unit/acceptance tests in the same directory, losing the possibility to run all the tests in that directory quickly. Remember that acceptance and integration tests are slower than unit tests.
In a real project we will need to run all the unit tests alone to ensure that they are passing and checking the current step in the inner TDD loop. That is why is a good idea to separate them.

This image shows the testing flow that we are going to follow: the double loop of TDD. The outside loop corresponds to the progress of our feature and the inner loop corresponds to the individual functionals required to implement the feature.
It's worth defining our test types very clearly.
So, now that we have our requeriments, we have to start writing an acceptance test. It will provide the current step of the outside loop we are in. We can re-run this test anytime to figure out what the progress of our feature is.
This test validates that our system complies with the acceptance criteria that the business owner has agreed to, being the bridge between developers and business. Once the feature is finished, the acceptance test will also serve as a regression test, quickly alerting us if future code change breaks or changes the functionality. For now, it is going to offer us feedback about the progress. The acceptance test should be as end-to-end as possible, but still within the boundaries of your system and not relying on any external systems or dependencies.
The naming conventions that we are going to use come from this Codurance blog post. The unit tests of our classes are going to use the suffix “Should” which allows us to read the class name and the test method name as a full sentence. For the acceptance test we are going to use the suffix “Feature” so we can easily differentiate between acceptance and unit tests.
For the test implementation of this kata we are going to use the notation Given, when, then. This will allows to express the acceptance criteria in the code as closely as possible within the code itself. It will help us to use the ubiquitous language that the business owner has used to write the acceptance criteria. It is a win-win - we have the test written conforming to the 3-As pattern and we gain a ubiquitous language from the business.
That is it for now. We have reviewed the basic concepts about TDD and, more specifically, the outside-in approach. In the next post we will start creating our first acceptance test and we will dive into the inner TDD loop until we get our feature working. Stay tuned!


Software es nuestra pasión.
Somos Software Craftspeople. Construimos software bien elaborado para nuestros clientes, ayudamos a los/as desarrolladores/as a mejorar en su oficio a través de la formación, la orientación y la tutoría. Ayudamos a las empresas a mejorar en la distribución de software.