
- Por André Guelfi Torres
- ·
- Publicado 16 Apr 2019
Both Amir and I have just recently started at Codurance as apprentices. This week, one of our tasks was to set up Jenkins on a new server then add a client’s project for building and testing. Thanks to an excellent tutorial from Jeff Shantz, it ended up being a relatively straight forward task. We then wanted to create a way for the client to be able to download their tested application. However we got more than a little stumped when it came to deploying those assets to a new location on the server. Frantic Googling had us going around in circles.
Luckily, a pairing session with Codurance Craftsman Samir pointed us in the right direction we thought we would set out our process below in case any other Jenkins newbies got stuck like we did.
Note, I'll assume you have a client project set up on Jenkins, and it is connected to your version control system. If you have not got this far then checking out the link to the tutorial earlier will help.
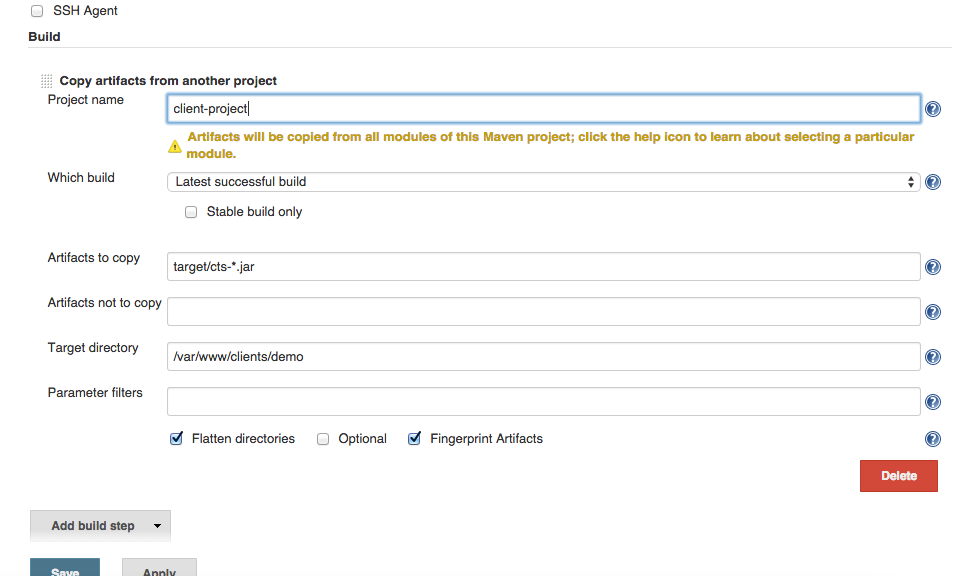
Select 'New item' from the main menu and call it something like "[ENTER-PROJECT-NAME]-Output". Its purpose will be solely export the files from your client project to a folder of your choosing on the server.
Go to your client project and select configure. Create a post-build action and select ‘archive artififacts’ from the drop down menu. Add the type of files you want to archive (and eventually, copy and export). Next add another post-build action ‘Build other project’ and enter the name of the build item you created earlier.

Next you need to install the Copy Artifact plugin in the Manage Plugins section of Jenkins. Go to "[PROJECT-NAME]-Output" > configure and add a new build step. Because you have installed the Copy Artifact plugin you should see an option called ‘copy artifacts from another project’ in the drop down menu. Specify the folder or files you want copied and set the location path. Notice that we set set our location to "var/www/clients/…". This leads to a new folder on the server (we were using an Apache server on an Amazon EC2 instance). Don't do what we did and set the path using an http address(!).
Trigger a build from your client-project. This should then trigger a new build in [PROJECT-NAME]-Output. Check the deployment folder you set up on the server. Hopefully you will see the newly-deployed files but...
It may mean that Jenkins does not have the right permissions to write to the folder and cannot deploy the files.
SSH into your server and check the permissions of you output folder. As you might have guessed we ran into this problem and manage to fix this by:
Don’t forget to restart your server to finalise the changes!


Software es nuestra pasión.
Somos Software Craftspeople. Construimos software bien elaborado para nuestros clientes, ayudamos a los/as desarrolladores/as a mejorar en su oficio a través de la formación, la orientación y la tutoría. Ayudamos a las empresas a mejorar en la distribución de software.